Additive Manufacturing (AM) is a class of manufacturing methods that has unique capabilities allowing users to vary material properties throughout the component. This can be done by changing the constituent material or its finer structure using lattices or various processing parameter inside the slicing software.
FormFlow is the latest addition to optimise your components using this powerful new paradigm. To showcase this, in this article we optimise a CPU water-cooler. The back of the cooler is subjected to heat, it will propagate through the block into the water channel, and the water will take away the heat, effectively cooling the whole computer.
The optimisation problem we’d like to solve here is; How can I allocate the right material in the right place to conduct the heat most efficiently whilst keeping my component as cheapest and light as possible?
Let’s choose Steel (316L) for to its low cost and high strength and Copper for its superior thermal conductivity. That way by adding copper, it is possible to improve the thermal performance of the component, while maintaining the same mass. The disadvantage of copper however is that it is heavier than steel and is also more expensive. Therefore, it is desired to find an optimal material distribution of the steel and copper in the component, with the ultimate objective of reducing the cost of the material beyond simply using steel.
It is worth noting that FormFlow is material agnostic, Polymers, Metals, Ceramics and other materials are all supported including isotropic, orthotopic and anisotropic defininitions.
Step 1: Loading the Design Space
The first step is to load a 3D model of the CPU water-cooler. This model represents the volume in which we can add material. The recommended file type is STP/IGES but STL’s are also supported. Moreover, users have the option to load additional geometries which are useful for post-processing and volumetric selected (more on that in another article).
Step 2: Defining Boundary Conditions
Now we need to define the physical loads that model the working condition of the component. Here, this CPU water-cooler is subjected to a constant temperature of 90°C produced by the CPU on its flat side. This heat will be transferred to the water pipes through convection, we define this using a heat transfer coefficient of 0.0004 W/mm² and a temperature of 20°C.
Users can define any number of mechanical, thermal and frequency conditions, which can be combined to suits your application.
In this step, we define the optimization problem, the objective function and the constraints.
Step 3: Define the optimization strategy
In FormFlow, the optimization problem is defined using an intuitive and handy drag-and-drop graph. By contrast to other optimization software, the use of such an interface allows for ease of visualizing and clear oversight of all the different constraints and boundary conditions. It is easy to check and verify the operations we are doing (e.g. minimizing or maximizing objective, checking constraint values) without having to navigate through multiple complicated drop-downs and windows, which increases chances of error.
In addition, FormFlow allows the user to save multiple different graphs, which makes it very easy for the user to generate different objective functions and constraints for the same problem without having to edit the already existing graph.
For this example, we specify an objective to minimize the thermal compliance while constraining the maximum volume to be 60% of the volume of the design space.
Below you can see a quickly growing list of various functional blocks that provides users with unprecedented flexibility when defining optimisations without writing a single line of code.
Step 4: Define the solver settings
The final step is for us to define the main settings, these are dependant upon our choice of the manufacturing method, here we choose a discrete boundary which yield “segments” of one material of the other.
With the solver set in place, it is time to conduct optimization. As shown above, we can queue multiple optimization cases, thus automating the process of comparing optimization cases with different settings. In this example, the material allocation is varied by increments of 20% and the results of each compared later.
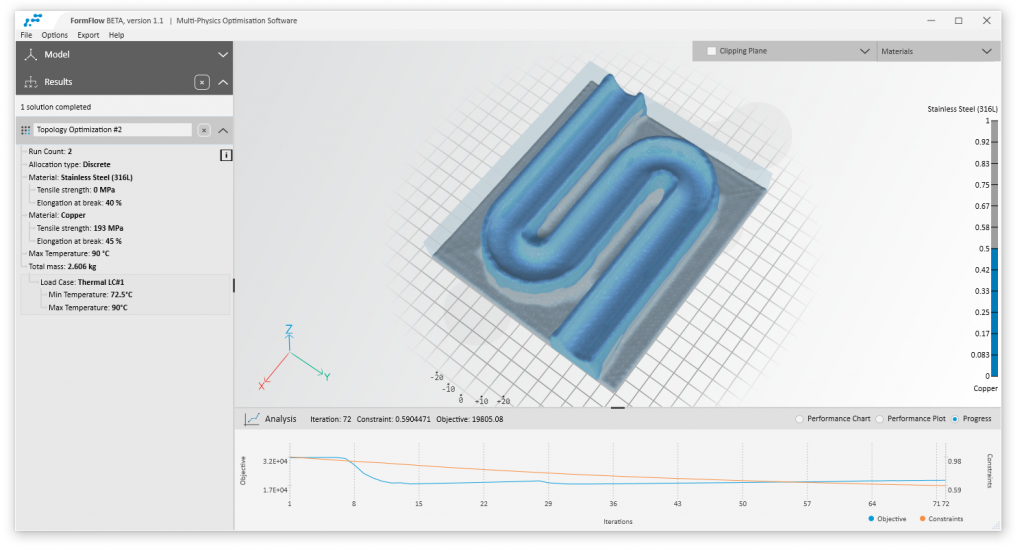
Step 5: Optimize!
The following shows the optimization process for one of the multi-material cases.
Step 6: Analyze Results

The following table shows the result of the optimization with different material allocations from full Stainless Steel (SS) to full Copper (CU) in increments of 20%. We can see that each option presents some trade-offs worth exploring. These are plotted in the table below.
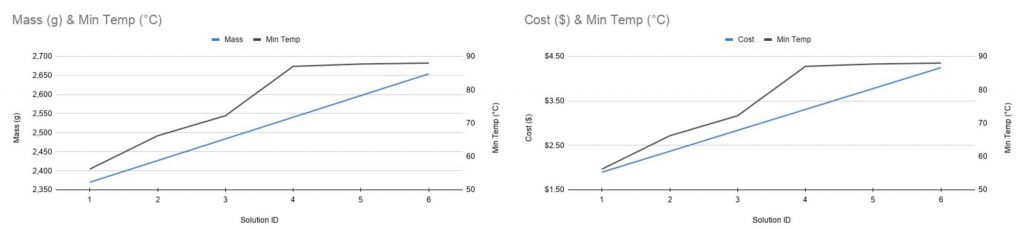
It is clear that we have some diminishing returns beyond 60% of copper. We can therefore select solution #4 as the “optimal” candidate along with the following observation:
Solution #4 is 43% better at conducting heat than the full stainless steel whilst also being 25% cheaper and 4% lighter than the full copper solution.
The resulting form is shown below, grey is copper and blue is steel:
FormFlow is also able to visualize sliced views of the temperature distribution, as well as the material allocations as shown below:
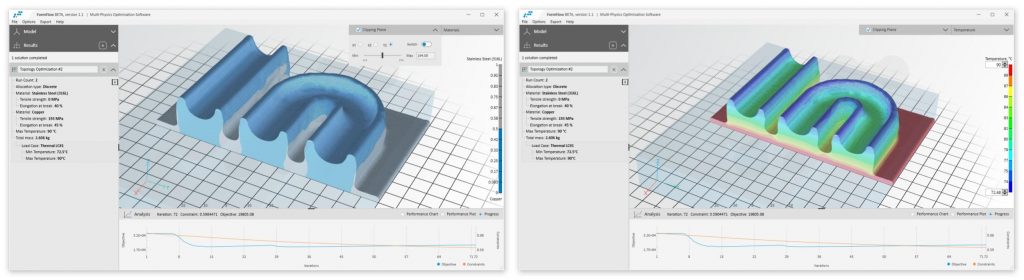
From here we can directly export the 3D files for manufacturing or re-import into any CAD software to carry out further changes or validation.
To conclude, this article has shown the potential of multi-material manufacturing in both improving component performance and minimizing cost, with FormFlow being the state-of-the-art software that is easy-to-use, accurate and trustworthy for discovering and achieving this potential.
Finally, astute readers may question the manufacturability of the component, whilst Directed-energy deposition (DED) may be a great option for this with the 3D pointing toolbox, with some post-processing the most cost-effective solution may be to CNC it from a solid block of material. However, as always, this choice will be dependant upon the specification of the application.
Go to our website to get your access to a free 14-day trial license. If you have any question, feel free to email us at [email protected]